Difference between revisions of "Spike Prime - Measuring Speed"
m |
m |
||
| (6 intermediate revisions by the same user not shown) | |||
| Line 1: | Line 1: | ||
| − | == | + | <small>(''[[Spike up Prime Interest in Physics|back to list of projects]]'')</small> |
| + | |||
| + | == Let's begin == | ||
Lucky drivers who have never paid a speed ticket. Unlucky people who's been hurt by those who were not able to control their speed. Automatic speed control systems help keep the roads safe. In this exercise, we will build a simple vehicle and a speed measuring sensor module. We will experiment with measuring speed in different ways. | Lucky drivers who have never paid a speed ticket. Unlucky people who's been hurt by those who were not able to control their speed. Automatic speed control systems help keep the roads safe. In this exercise, we will build a simple vehicle and a speed measuring sensor module. We will experiment with measuring speed in different ways. | ||
| + | |||
== Build == | == Build == | ||
| Line 29: | Line 32: | ||
* [[Media:spike_measure_speed_vehicle.io|vehicle (stud.io)]] | * [[Media:spike_measure_speed_vehicle.io|vehicle (stud.io)]] | ||
* [[Media:spike_measure_speed_model_hub_and_sensor.io|sensor module (stud.io)]] | * [[Media:spike_measure_speed_model_hub_and_sensor.io|sensor module (stud.io)]] | ||
| + | |||
== Program == | == Program == | ||
| Line 36: | Line 40: | ||
Download: [[Media:measure_speed.llsp|measure_speed.llsp]] | Download: [[Media:measure_speed.llsp|measure_speed.llsp]] | ||
| + | |||
| + | The vehicle should start in a distance > 120 cm. After the program is started, it starts counting 5,4,3,2,1... giving you 5 seconds to get ready. After that, it waits for the arrival of the vehicle. Next, each time vehicle enters area that is closer than 110, 80, or 50 cm respectively, it measures the time it takes the vehicle to travel 30cm. These times are stored to variables t1, t2, t3. | ||
| + | |||
| + | The speed of travel in each of the three segments is calculated using the formula | ||
| + | |||
| + | '''v = d / t''' | ||
| + | |||
| + | v - velocity<br> | ||
| + | d - distance<br> | ||
| + | t - time<br> | ||
| + | |||
| + | Finally the average speed over the three segments is calculated and shown on the hub display. | ||
| + | Note: as we will learn in the next exercise, this is not a proper average speed. | ||
| + | |||
| + | On the computer screen, in the section with variables, you can see the values of all the variables. | ||
| + | |||
== Measure, analyze, think == | == Measure, analyze, think == | ||
| Line 46: | Line 66: | ||
Example result of measurement: | Example result of measurement: | ||
| − | [[Image:spike_measure_speed_variables.png|result of measurement | + | [[Image:spike_measure_speed_variables.png|result of measurement]] |
| + | |||
| + | * Perform measurements with your model and discuss in your group what has happened. | ||
| − | |||
== Explore and modify == | == Explore and modify == | ||
| − | * Modify the program so that it will measure the maximum speed instead of the average | + | * Modify the program so that it will measure the maximum speed instead of calculating the average |
* Modify the model so that it will be propelled by motors, and make a program to move in constant velocity, then repeat the measurement | * Modify the model so that it will be propelled by motors, and make a program to move in constant velocity, then repeat the measurement | ||
| + | |||
== Present == | == Present == | ||
| − | * Prepare a short presentation for | + | * Prepare a short presentation for other groups. Tell others about how your measurement went, what issues did you have to solve. What do they mean and why did they happen? |
| + | |||
== Additional resources == | == Additional resources == | ||
| − | * Download: [ | + | * Download: [http://robotika.sk/spike/spike_physics_1_measure_speed.zip Measure speed - all media files] |
__notoc__ | __notoc__ | ||
Latest revision as of 15:39, 28 February 2020
Let's begin
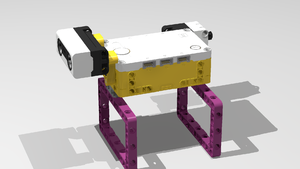
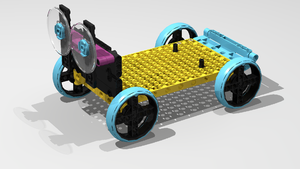
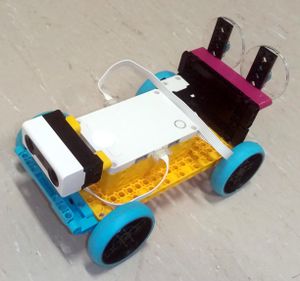
Lucky drivers who have never paid a speed ticket. Unlucky people who's been hurt by those who were not able to control their speed. Automatic speed control systems help keep the roads safe. In this exercise, we will build a simple vehicle and a speed measuring sensor module. We will experiment with measuring speed in different ways.
Build
Model:
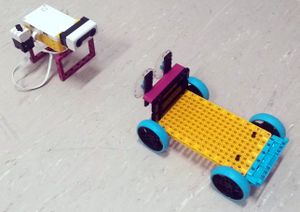
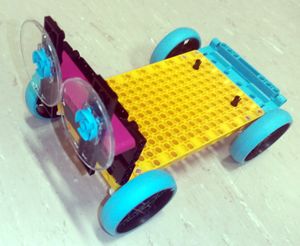
Pictures:
Building instructions:
Download building instructions:
Download stud.io model:
Program
Download: measure_speed.llsp
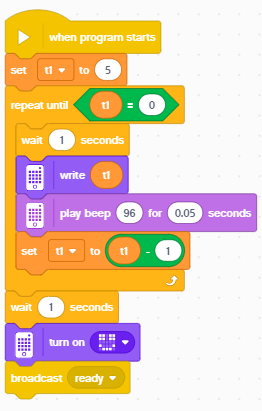
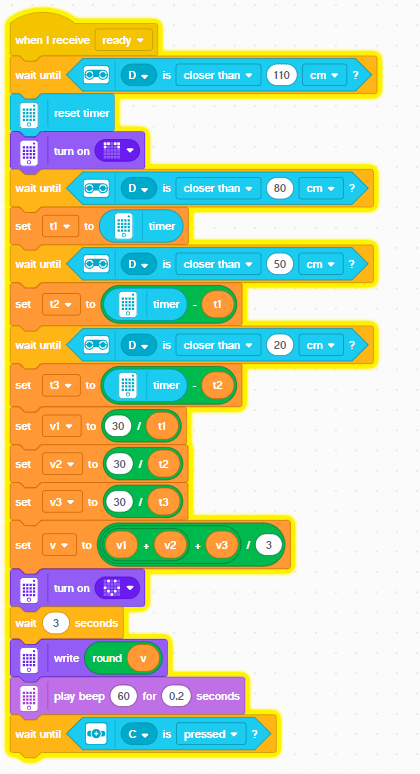
The vehicle should start in a distance > 120 cm. After the program is started, it starts counting 5,4,3,2,1... giving you 5 seconds to get ready. After that, it waits for the arrival of the vehicle. Next, each time vehicle enters area that is closer than 110, 80, or 50 cm respectively, it measures the time it takes the vehicle to travel 30cm. These times are stored to variables t1, t2, t3.
The speed of travel in each of the three segments is calculated using the formula
v = d / t
v - velocity
d - distance
t - time
Finally the average speed over the three segments is calculated and shown on the hub display. Note: as we will learn in the next exercise, this is not a proper average speed.
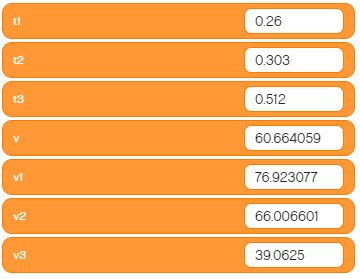
On the computer screen, in the section with variables, you can see the values of all the variables.
Measure, analyze, think
- Make your own recording
Example result of measurement:
- Perform measurements with your model and discuss in your group what has happened.
Explore and modify
- Modify the program so that it will measure the maximum speed instead of calculating the average
- Modify the model so that it will be propelled by motors, and make a program to move in constant velocity, then repeat the measurement
Present
- Prepare a short presentation for other groups. Tell others about how your measurement went, what issues did you have to solve. What do they mean and why did they happen?
Additional resources
- Download: Measure speed - all media files
