Difference between revisions of "MiniMexleIO"
From RoboWiki
| Line 6: | Line 6: | ||
also active low (i.e. LED lights when port is logic 0). | also active low (i.e. LED lights when port is logic 0). | ||
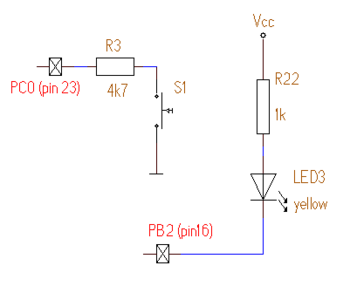
| − | [[Image:MiniMexleIO.png|center|thumb| | + | [[Image:MiniMexleIO.png|center|thumb|350px|Connection of the LED and pushbutton on the MiniMEXLE board.]] |
And here is a short C-code for controlling them: | And here is a short C-code for controlling them: | ||
Revision as of 11:32, 5 November 2008
The usual "Hello, World!" program in the area of the single chip microcontrollers is to connect a pushbutton and LED and to control them.
We already have the pushbutton and the LED on the MiniMexle board - the pushbutton is connected to the pin PC0 and is active low, the LED is connected to PB2 and is also active low (i.e. LED lights when port is logic 0).
And here is a short C-code for controlling them:
#include <avr\io.h>

int main()
{

/* ***************** Initialization ************************ */

/* Port settings for LED *********************************** */
     DDRB = 0b00000100;     // bin: 0000 0100  1 = out, 0 = in
    PORTB = 0xFF;           // bin: 1111 1111  1 = LED off

/* Port settings for Switch ******************************** */
     DDRC = 0b00000000;     // bin: 0000 0000  1 = out, 0 = in
    PORTC = 0xFF;           // bin: 1111 1111  1 = pull-up active

/* ***************** Endless loop ************************* */


  while (1) {

  if (PINC & 0b00000001) then
     PORTB = 0x04;
  else
     PORTB = 0x00;

  }

}
Task:
The task is to control the on and off state of the LED with a single button. First press of the button will set LED on, second press off. Hint: You will need a memory to store the actual LED state to change it.
