Difference between revisions of "Boe-Bot"
(→Evaluation) |
|||
| (10 intermediate revisions by the same user not shown) | |||
| Line 5: | Line 5: | ||
Boe-Bot is a small mobile robotic kit made by [http://www.parallax.com Parallax, Inc.] | Boe-Bot is a small mobile robotic kit made by [http://www.parallax.com Parallax, Inc.] | ||
| − | An acronym Boe in its name stands for [http://www.parallax.com/ | + | An acronym Boe in its name stands for [http://www.parallax.com/product/28803 Board of Education], the electronic board, which controls the robot. As its name implies, it is used mainly for education. In our article we will give a brief description of the kit labeled [http://www.parallax.com/product/28132 Boe-Bot Robot Kit - Serial (with USB adapter and cable)] - order code [http://www.parallax.com/product/28132 #28132] by the Parallax, Inc. It can be purchased directly from their e-shop for 160 USD or from one of their [http://www.parallax.com/company/distributors distributors] (e.g. [http://www.mite.cz MITE] in the Czech Republic or [http://www.rlx.sk/ RLX components] in Slovakia). |
| Line 13: | Line 13: | ||
(see Fig. 1). The people in Parallax then draw a CAD design which was | (see Fig. 1). The people in Parallax then draw a CAD design which was | ||
cut out of aluminum on the NC machine. So the first Boe-Bots were born. | cut out of aluminum on the NC machine. So the first Boe-Bots were born. | ||
| − | A little bit later a textbook by Andy Lindsay - [[#Reference1|Robotics with the Boe-Bot<SUP>[1]</SUP>]] appeared and to day there was more than 80 000 | + | A little bit later a textbook by Andy Lindsay - [[#Reference1|Robotics with the Boe-Bot<SUP>[1]</SUP>]] appeared and to day there was more than 80 000 robots |
| − | produced. In the Czech and Slovak republics there | + | produced. In the Czech and Slovak republics there are also some of them. |
There are also special courses for teachers and the kits are used | There are also special courses for teachers and the kits are used | ||
in secondary schools and universities not only in America but all | in secondary schools and universities not only in America but all | ||
| Line 20: | Line 20: | ||
The robot can be built up by 12-year pupils, but as I can confirm, with a little help from an adult also smaller ones can handle it. | The robot can be built up by 12-year pupils, but as I can confirm, with a little help from an adult also smaller ones can handle it. | ||
| − | The kit does not require almost no prior robotic knowledge. | + | The kit does not require almost no prior robotic knowledge. |
| − | |||
== Kit contents and contstruction == | == Kit contents and contstruction == | ||
| Line 237: | Line 236: | ||
== Programs == | == Programs == | ||
| − | + | Following programs are full-length tested versions of programs mentioned above. | |
| − | |||
| − | |||
| − | |||
| − | |||
| + | * [[SquareDance.BS2]] | ||
| + | * [[TactileNavigation.BS2]] | ||
| + | * [[InfraRedNavigation.BS2]] | ||
* [[SHIFTIN.BS2]] | * [[SHIFTIN.BS2]] | ||
| − | |||
== Interview == | == Interview == | ||
| − | * Interview with Chuck Schoeffler, one of the originators is on separate page | + | * Interview with Chuck Schoeffler, one of the robot originators is on separate page. |
* Interview with Ken Gracey, vice-prezident of Parallax, Inc, is [http://www.botmag.com/articles/parallax.shtml here] | * Interview with Ken Gracey, vice-prezident of Parallax, Inc, is [http://www.botmag.com/articles/parallax.shtml here] | ||
== References == | == References == | ||
| − | * [1] Andy Lindsay: [http://www.parallax.com/ | + | * <div id="Reference1">[1] Andy Lindsay: [http://www.parallax.com/sites/default/files/downloads/28125-Robotics-With-The-Boe-Bot-v3.0.pdf Robotics with the Boe-Bot] </div> |
| + | * <div id="Reference1">[2] [http://www.parallax.com/sites/default/files/downloads/27218-Web-BASICStampManual-v2.2.pdf Basic Stamp syntax and reference manual]</div> | ||
| − | |||
| − | |||
| − | + | === Software required === | |
| − | + | An overview of all the software is [http://www.parallax.com/downloads/basic-stamp-editor-software here] (also the versions for Macintosh and Linuxes) | |
| − | + | You will need: | |
| − | * | + | * [http://www.parallax.com/sites/default/files/downloads/BS-Setup-Stamp-Editor-v2.5.3-%28r2%29.exe BASIC Stamp Windows Editor version 2.5.3] (~18.5 MB) Windows 2K/XP/Vista/7/8/8.1 <BR> |
== Links == | == Links == | ||
| Line 273: | Line 269: | ||
'''Documentation''' | '''Documentation''' | ||
| − | * [http://www.parallax.com/ | + | * [http://www.parallax.com/product/boe-bot-robot Boe-Bot robot description] (Parallax, Inc.) |
| − | * [http://www.parallax.com/ | + | * [http://www.parallax.com/sites/default/files/downloads/28125-Robotics-With-The-Boe-Bot-v3.0.pdf Robotics with Boe-Bot robot] (učebnica, v.3.0. Parallax) |
* [http://en.wikipedia.org/wiki/Boe-Bot Boe-Bot on Wikipedia] | * [http://en.wikipedia.org/wiki/Boe-Bot Boe-Bot on Wikipedia] | ||
| Line 284: | Line 280: | ||
'''Boe Bot Workshop''' | '''Boe Bot Workshop''' | ||
* [[Boe Bot Workshop]] | * [[Boe Bot Workshop]] | ||
| + | * [http://forums.parallax.com/showthread.php?82013-Stamps-in-Class-quot-Mini-Projects-quot Mini Projects @ Parallax] | ||
| + | |||
| + | '''Tips''' | ||
| + | * [http://forums.parallaxinc.com/forums/default.aspx?f=6&m=99734 Better Boe-Bot IR Distance Measurements] (Circuit + Programs) | ||
| + | * [http://www.parallax.com/tabid/553/Default.aspx Angle of Incline from the Memsic 2125] | ||
| + | * [http://forums.parallax.com/showthread.php?122397-How-the-Ping-sensor-works How the Ping sensor works] | ||
Latest revision as of 08:02, 9 July 2014
Contents
Introduction
Boe-Bot is a small mobile robotic kit made by Parallax, Inc. An acronym Boe in its name stands for Board of Education, the electronic board, which controls the robot. As its name implies, it is used mainly for education. In our article we will give a brief description of the kit labeled Boe-Bot Robot Kit - Serial (with USB adapter and cable) - order code #28132 by the Parallax, Inc. It can be purchased directly from their e-shop for 160 USD or from one of their distributors (e.g. MITE in the Czech Republic or RLX components in Slovakia).
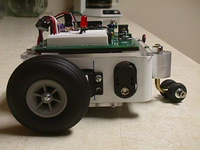
An idea of the robot appeared at the Idaho University in the Chuck Schoeffler's head. He attached the Board of Education to a plastic box (see Fig. 1). The people in Parallax then draw a CAD design which was cut out of aluminum on the NC machine. So the first Boe-Bots were born. A little bit later a textbook by Andy Lindsay - Robotics with the Boe-Bot[1] appeared and to day there was more than 80 000 robots produced. In the Czech and Slovak republics there are also some of them. There are also special courses for teachers and the kits are used in secondary schools and universities not only in America but all around the world.
The robot can be built up by 12-year pupils, but as I can confirm, with a little help from an adult also smaller ones can handle it. The kit does not require almost no prior robotic knowledge.
Kit contents and contstruction
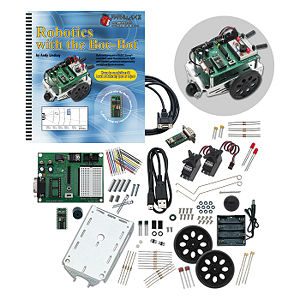
Complete kit (see Fig. 2) contains all the mechanical components necessary to build a robot. You may need also small tongs or tweezers, handy screwdriver is already bundled with the kit. Other tools are not necessary. In the box you will find also a Board of Education and programming cable. There exists a kit that has an USB interface directly on the board and connects using a Mini-USB cable. Version, which we describe here, contains a serial RS-232 cable, plus a small converter USB/232 with the cable. This version we prefer, as in our opinion, RS-232 interface is more robust and you will get the converter to USB, which can be used also elsewhere.
An excellent 345-pages textbook and a CD-ROM with all the necessary software is also part of the kit. Finally, you will find some other components (LEDs, resistors, sensors, spacers) in a box that you will use later in experiments according to the textbook.
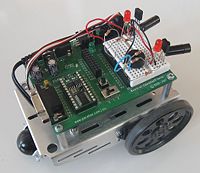
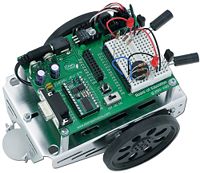
Robot can be built up in half an hour. It's base is an aluminum chassis to which you have to attach two motors and wheels, four AA batteries holder and a rear wheel (castor). It is a ball made of polyethylene, which is attached to the frame with split pin. Finally, you will attach the electronics board on spacers. Voila, the robot is ready for programming (see Fig. 3)!
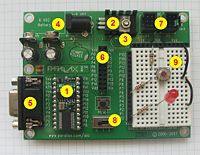
Let's look on Board of Education (Fig. 4) in more detail. Its heart is a BasicStamp II processor. It is a tiny printed circuit board (31 mm x 16 mm x 9 mm), which contains microprocessor Microchip PIC 16F57 and PBASIC language interpreter. For program and fixed data storage an external serial EEPROM is used, variables are stored in internal RAM. The Board of Education contains BasicStampII (1), and power stabilization circuit with low-drop stabilizer LM2940 (2) and LED indicator (3), 9V battery or wall-adapter connectors (4), RS-232 connector (5), connector for expansion modules (6) and connectors for motors (7). Board is switched on/off with three position switch (8) (everything off - everything on except the motors - everything on). Roughly one third of the board occupy an universal solderless breadboard (9). There are also the power supply and processor ports connectors on its sides. This section is used for various experiments and creation of your own circuits. The Board of Education is also used in many other Parallax educational kits (e.g. What's a microcontroller, Applied Sensors, etc.).
Almost each robotic experiment according to the book requires additional components to be connected into the solderless breadboard area - whether it's only LED indicator, or complicated ultrasonic sensor. The microprocessor ports are all available, so simply connect your new circuit to the processor and you can start programming.
How to program the robot?
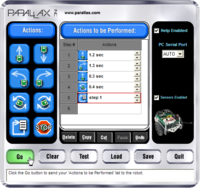
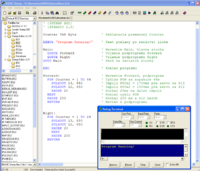
Absolute beginners can use a simple graphical programming language Gui-Bot, where the program consists of a sequence of several graphical elements (Fig. 5). For routine work with a robot is used PBASIC programming language. Language commands are first translated to the tokens, those to be loaded into the EEPROM. From there they are subsequently carried out by a built-in PBASIC language interpreter. To write, translate and download programs, freely available Basic Stamp Editor for Windows is available (there are also solutions for MAC and Linux).
For digital inputs and outputs operation You can use commands IN, HIGH and LOW. For more specific applications there are additional commands available - FREQOUT (the signal of specified frequency to certain output), - PULSIN (measuring pulse length at specified input), - SHIFTOUT (at the specific output sends sequence of pulses, can be used for serial communication with peripherals) - PULSOUT (pulse of the specified length at specific output).
Some of them are probably familiar to readers of Robotrevue magazine from the series about the Picacxe processors. The last-mentioned PULSOUT command (see also Robotrevue 02/2010) is also used to control the modified RC servo motors, which drive the robot. Using this command, you will find also one of the PBASIC language limitations. During the instruction PULSOUT processor cannot do anything else, it only outputs pulses. So you cannot e.g watch a sensor at the same time and respond quickly to an obstacle. You have to split Your program to small fast-executing parts with an impression of "concurrent" movement and sensing. In simple programs this is of course not a problem, but as your programs become more and more complicate, you will also find it more limiting.
For debugging purposes it is very good to have an possibility to print various reports, current state of variables etc. Messages sent from the robot via a serial interface (DEBUG command) are displayed on any terminal - one is included in the development environment.
To demonstrate how the robot is programmed, here are simple programming examples. First one is for robot driving around a square. See also a corresponding video.
Main:                       ' Main loop starts here
  GOSUB Forward             ' Subroutine to drive the robot forward
  GOSUB Right               ' Subroutine to drive the robot right
  GOTO Main                 ' Do this forever
END                         ' End of the main loop

Forward:                    ' Subroutine Forward
  FOR counter = 1 TO 50     ' Do this loop 50x
    PULSOUT 13, 850         ' Send short pulse to left servo
    PULSOUT 12, 650         ' Send another to right servo
    PAUSE 20                ' Wait for another pulse
  NEXT
  RETURN                    ' Return from subroutine
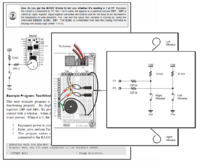
Second program is an excerpt from the program for robot navigating using whiskers. Full length listing is included at the end of the page. See also a corresponding video.
' -----[ Main Routine ]-------------------------------------------------------

DO                                    ' Neverending loop

  IF (Left = 0) AND (Right = 0) THEN  ' Front obstacle
    GOSUB Go_Back                     ' Back up & U-turn (left twice)
    GOSUB Go_Left
    GOSUB Go_Left
  ELSEIF (Left = 0) THEN              ' Obstacle on left
    GOSUB Go_Back                     ' Back up & turn right
    GOSUB Go_Right
  ELSEIF (Right = 0) THEN             ' Obstacle on right
    GOSUB Go_Back                     ' Back up & turn left
    GOSUB Go_Left
  ELSE                                ' Nothing in front
    GOSUB Go_Forward                  ' Apply a forward pulse
  ENDIF

LOOP                                  ' and repeat again
The above mentioned book 'Robotics with Boe-Bot' contains dozens of tasks, which will go over all the basic components of the robot. This helps you to understand deeply not only basic robot moves, but also how to interpret the world using simple sensors. At the end of each chapter there is number of open issues presented to reader. Its solving also helps to better understanding of the problem. After mastering the movements, change directions, speed and acceleration a chapter follows in which the robot uses two whiskers - the bumpers. With them, you try mobile robot navigation and motion without an accident - detection of obstacles, walls. Next chapter deals with photoresistive sensors. These allow the search for light and dark places, or to track the battery light spot. Last chapters of the book deal with modulated infrared sensors to detect obstacles and avoid them. These sensors can be also used to estimate a distance from wall and to maintain a constant distance from it (basics of control loop).
I'm finished. What to do now?
When finishing all the examples listed in the book, You can do Your own experiments, or you can buy some accessories. Perhaps the simplest is the infrared remote control, which is supplied with very comprehensive instruction manual. Since the remote control You can find at home already and guide can be downloaded for free from the manufacturer's website, it is certainly worth a try.
Another typical application for a mobile robot is linefollowing. Of course, you can try - there is a kit with four infrasensors attached to the studs and spacers supplied with a detailed manual to help You understand how to program a robot to decide whether on white or black line. Of course, it is possible to design and make your own sensors.
Another interesting accesory is a simple gripper. There is also a kit which will turn your Boe-Bot Robot into a tank with the gears and tread or even into a six-legged walking robotic bug. There is also very long list of sensors available - compass, accelerometer, ultrasonic, or encoders in the wheels, allowing for more precise position control of a robot.
Conclusions
Some people may found the PBASIC programming language a disadvantage, as it lacks custom functions or libraries. Experienced users will surely miss direct access to peripherals, e.g. timers and counters. You will definitely be missing the interrupts. For beginners, it is of course not a problem, You can go very far even without those features. Later you may encounter a lack of RAM and EEPROM, but for the school and beginner projects it should be sufficient. Another limit (especially for those competitors) is a robot speed - as it uses the modified RC servos it is quite slow. Some people consider also the kit price relatively high.
On the other hand, you will obtain a robot which fits in a large number of activities, so it's definitely not a one weekend toy. It is very robust, durable and suitable for beginners. Very good textbook will be appreciated especially by the teachers and selfeducators. Not every teacher has the time (and abilities) to create and invent new activities. Textbook, will provide enough material for many lessons. Moreover, teachers may ask the company for slides with presentations and the company is also very helpful with its translations.
When comparing the Boe-Bot robot with the popular Lego Mindstorms NXT kit, it is clear that it lacks its mechanical variability. Boe-Bot is more or less fixed structure and there is not too much to change. However, the chassis contains many holes which enable to add and use a lot of accessories (sensors, Meccano parts etc.) Also the programming possibilities of the Boe-Bot robot are narrower than Lego Mindstorms, because just PBASIC and graphic languages are available here. However, where the Boe-Bot is clear winner is the electronics expansion. Using the breadboard area you can connect almost anything to Your robot. Moreover, the Board of Education itself allows to learn basics of sensor technology, digital circuits and simillar topics.
It is an excellent entry kit for those who want to know robotics and learn something more.
BasicStamp II Technical data
Case		24-pin DIP
Dimensions	30,6 x 15,7 x 8,2 mm
Frequency	20 MHz
Speed	        ~ 4000 instructions / sec
RAM		32 B (not kB, just B!)
EEPROM	        2kB (~500 instructions)
I/O		16 (+ 2 dedicated serial)
Supply         5 – 15 Vdc (contains regulator)
Consumption    3 mA run / 50 uA sleep @5V
Load           20 mA / pin & max. 40 mA / chip
Boe-Bot Technical data
Dimensions:    150 x 114 x 102 mm
Weight:        300 g bez batérií
Supply:        4 x AA batteries or wall adapter
Speed:         approx 17 cm/s
Programs
Following programs are full-length tested versions of programs mentioned above.
Interview
- Interview with Chuck Schoeffler, one of the robot originators is on separate page.
- Interview with Ken Gracey, vice-prezident of Parallax, Inc, is here
References
- [1] Andy Lindsay: Robotics with the Boe-Bot
Software required
An overview of all the software is here (also the versions for Macintosh and Linuxes)
You will need:
- BASIC Stamp Windows Editor version 2.5.3 (~18.5 MB) Windows 2K/XP/Vista/7/8/8.1
Links
Following are links for those who wants to know more:
Documentation
- Boe-Bot robot description (Parallax, Inc.)
- Robotics with Boe-Bot robot (učebnica, v.3.0. Parallax)
- Boe-Bot on Wikipedia
Video
- Boe-Bot robot driving square (YouTube video)
- Boe-Bot robot roaming with whiskers (YouTube video)
- Boe-Bot robot roaming with infrared sensors (YouTube video)
Boe Bot Workshop
Tips
