Cerebot & LEGO Mindstorms/en
Contents
Goals
Our goal is to build a simple mobile robot using LEGO Mindstorms parts, motors and sensors (including the NXT servo motors) and control them with a Cerebot board that is based on Atmel AVR ATmega64.
Powering up
The board is powered with 3.6 - 9V DC power. It can receive power on three different connectors (either in wire screw terminal, or jumper cable, or usual plug of universal power adapter). It runs fine from 9V battery. In addition, it has another power input that can be used to drive the servo motor outputs. Alternately, it is possible to connect regulated 3.3 V on some of the interface connectors, but since the board has its own regulated power supply, we do not need that yet. Currently we either use an external power supply, or 9V battery.
First program
The board is very friendly, and contains interfaces for different programmers:
- JTAG3 parallel (or USB) cable from Digilent (connects to J3)
- Atmel ISP programmer 6-pin head J1
- JTAG ICE mkII debugging programmer connects to 10-pin head J2
The JTAG debugging interface is disabled by default, but we have the JTAG3 parallel cable from Digilent, so we will use that. Digilent publishes nice instructions of how to prepare and download the first program on their website. With some modifications, it really works, and the LEDs blink. To program with the JTAG3 cable, we can use WINAvr, a programming environment that includes the GCC for Atmel AVR platform. It can be used to program Cerebot in C/C++ easily. The result are .hex files that can be downloaded to Cerebot using the Digilent Programmer software. To debug using JTAG ICE mkII, we can use AVR Studio environment. All of the above tools run on Windows and are available free-of-charge.
Sometimes, the AVR processors happen to come into a state when they do not accept program - the software reports that the device cannot be switched to programming mode. The reason might be that the board is internally configured to use external clock, instead of internal clock. That is a difficult situation that cannot be escaped without supplying the clock signal on the X1 pin on the board, and reprogramming the internal fuse to use the internal clock. One can use a second working Cerebot to supply such external clock on its pin1 of JD port with the following program:
#include <avr/io.h> // Allows use of PORTX, PINX, DDRX etc.
int main(void)
{
 // Set up port E as outputs
 DDRE = 0xFF;
 // loop forever
 while(1)
 {
   // bring pins high
   PORTE = 0xFF;
   // bring pins low
   PORTE = 0x00;
 }
 return 0;
}
Debugging without JTAG ICE mkII
Since the AT Mega 64 has three UARTs (serial ports), we can print debugging information on one of these ports and transmit that to the PC somehow. Then, while our program runs on the AVR processor, it can print debugging information on the PC screen. One way to achieve this is using the Digilent peripheral module RS232 converter with usual Serial null-modem cable. Even more convenient is to use a BlueSmirf BT module (or equivalent), which can be connected, for example, to the JE port of the Cerebot, and further to the PC through some USB BlueTooth dongle. Aware:
- When using UART0 (on port JD), when the BlueSmirf module is connected, the processor cannot be programmed, because the same pins are used for SPI interface. However, if we use UART1 on port JE, the PC can remain connected while we reprogram the AVR, thus we will use UART1 instead of UART0 here.
- The Tx and Rx pins need to be crossed, i.e. we connect Rx of BlueSmirf to Tx of Cerebot, and vice versa - thus we cannot plug it directly to the connector, but need the convenient jumper cables that came with Cerebot (picture here later).
- Some of the USB BT dongles on the market are not suitable for use as general virtual serial port, or do not have an up-to-date driver - it pays off to select one from a well-known brand, or one that handles the Windows' own BT dongle driver from XP SP2.
Once we connect the UART of Cerebot to some serial port of PC, we can test that the communication works, with a terminal program (HyperTerminal in the worst case, or some more advanced terminal program, for example DockLight). To send data from AVR, we can use the usual printf() from stdio.h header-file in WinAVR's AVR libc, the standard C library for AVR. However, some functionality is not part of AVR libc, we have to provide it ourself. In particular, the functions for initialization of UART and for outputting a character. But there is a useful library AVRlib (it is different from AVR libc), where these functions can be found. Here is a Hello World program:
#include <avr/io.h>
#include <stdio.h>
#include <util/delay.h>

// this is included from AVRlib (we need to link with uart2.c and buffer.c)
#include <uart2.h>

static int uart1_putchar(char c, FILE *stream);
static FILE mystdout = FDEV_SETUP_STREAM(uart1_putchar, NULL, _FDEV_SETUP_WRITE);

// outputs one character to UART1
static int uart1_putchar(char c, FILE *stream)
{
 //we live in Windows world now
 if (c == '\n') uart1_putchar('\r', stream);

 //use UCSRnA, UDREn, UDRn,  for n=0,1,2 for different UARTs
 loop_until_bit_is_set(UCSR1A, UDRE1);
 UDR1 = c;

 return 0;
}

//this function sleep s seconds (if F_CPU is set to frequency of processor)
void sleep(uint8_t s)
{
 uint8_t i;
 while (s--) for (i = 0; i < 100; i++) _delay_ms(10);
}

int main(void)
{
 //set port E as output so that we can operate with LEDs
 DDRE = 0xFF;

 //first LED shows that program runs
 PORTE = PINE | 16;

 //initialize UART1 as 2400/odd parity (that's how our BlueSmirf is configured)
 uart1Init();
 uartSetBaudRate(1, 2400);
 UCSR1C |= 48;

 //setup character output function for stdout
 stdout = &mystdout;

 //wait 5 sec before printing
 sleep(5);

 //send string to UART1
 printf("Hello, world!\n");

 //turn off first LED to show that program terminates
 PORTE = PINE & ~16;

 return 0;
}
In this example, we use the standard C function printf() to print a string. Since there is no operating system running on our AVR [yet], there are no "devices" - like standard input and output, and thus we have to setup them, by providing a function that can output a single character to the output - the UART.
We can use the printf() function for printing usual data types, for example, the following lines:
printf("integer: %d\n", 3);
printf("float: %f\n", 3.1415926);
printf("char: %c\n", 'R');
printf("string: %s\n", "strng");
printf("hex: %x\n", 12345);
printf("long int: %ld\n",);
printf("unsigned: %u\n", -1);
Will produce the following output:
integer: 3
float: 3.141593
char: R
string: strng
hex: 3039
long int:
unsigned: 65535
But, in order to make the floating-point library to work, we have to supply the following extra options to the compiler:
-Wl,-u,vfprintf -lprintf_flt -lm
In the makefile, uncomment the following line:
PRINTF_LIB = $(PRINTF_LIB_FLOAT)
And as the BlueSmirf talks in both directions, we can easily write interactive programs that are remotely-controlled from the PC. For an example, see AVR calculator example program.
Challenges
We are now investigating how to read values from the various LEGO sensors, and motors of both RCX and NXT. The strength of Cerebot is that it has 8 ADC - that is possibility to read from 8 sensors, control 8 (or more) servo or DC motors.
Touch sensors
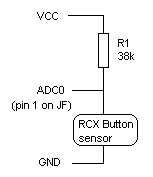
Touch sensors are the most simple sensors - they are simple variable resistors, where the resistance varies between infinity (when not pressed) and ca. 1000 Ohm when completely pressed. Thus we can connect the sensor in a series with another resistor, for instance 38 kOhm between VCC and GND outputs from the board:
The value on the ADC0 then will be 255 when the button is not pressed and almost 0 when it is pressed all the way in. The following project can be used to test this behavior: touch_sensor.zip.
By changing the resistor R1, we will get a slightly different scale depending on how much the button is pressed. For example, RCX is [probably] using 10k resistor.
Light sensors
Light sensors are more fun, because they are active sensors, that means that they must be powered to light up the red LED before reading the value. According to Mikael Gasperi's RCX sensor page, the sensor needs to be powered for some 3ms with about 8V (we could use unregulated voltage VU, or servo power VS from the Cerebot board), and then this is switched off, and the sensor is read the same way as the touch sensor.
In principle, passive sensors are measured against 5V with the 10k resistor divider as shown above, and active sensors are powered with up to 9V - however according to some reports, the output pins of 5V AVR can be used to power-up the sensor, but it is probably not smart in general (some sensors may require lot of power), and our AVR is 3.3V anyway (in fact, even the 3.3V version of AVR digital pin can light up the sensor's diode, but with a quite low brightness).
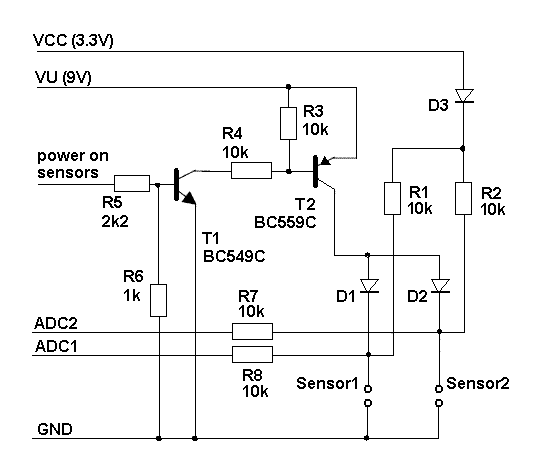
Thus the easiest way is to design a separate module that can take care of a couple of sensors. We were inspired by a similar project about interfacing FPGAs with Mindstorms, and designed the following circuit:
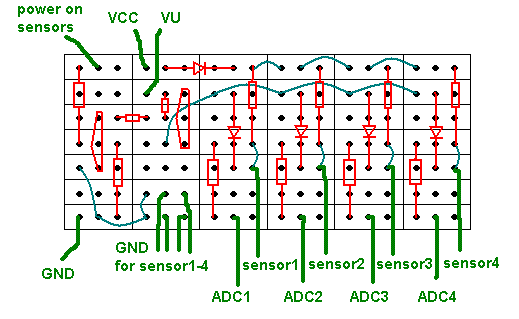
The schematic connects only two sensors, but it can handle more - for example in the circuit below, we connect to 4 different sensors. To add a new sensor slot, simply duplicate D2, R2, and Sensor2, and add another ADCn connector with resistor.
The idea of operation is that when the digital signal "power on sensors" is off (logical zero), the T1 and T2 are closed and the sensors are not powered. Setting this signal to logical one powers on the sensors with almost VU (this can be the 9V from Cerebot board). R7 and R8 attempt to protect the ADCs (well, perhaps somebody can tell me more if this is a good idea, required, and/or sufficient? well, at least it works :-). The LEGO 2-wire active sensors operate in such a way that they need to be first powered for some short time (usually specified as 3 ms, but 1 ms is enough for light sensor), and then this power is turned off (the logical zero on "power on sensors" signal), and the sensors together with R1,R2 form a voltage divider so that the voltage can be sampled by the ADCn input of Cerebot board (the ADC in Cerebot uses VCC as reference voltage). The diodes D1, D2 are here to separate the ADC inputs and D3 to protect the VCC on the board from the VU coming back through R1, R2.
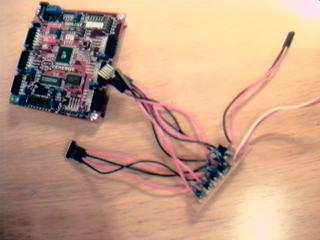
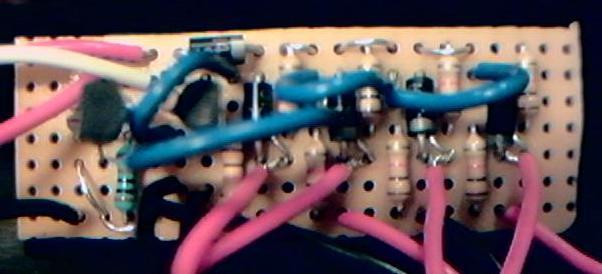
Using a testing circuit board, our design is somewhat hairy, but works (the pictures taken just with a webcam - sorry about the picture quality):
The numerous connections are: two wires for each of the four sensors, 4 wires for ADC1-ADC4, both voltages (VU, VCC), and the "power on sensors" signal together with the GND.
A testing program that samples all 8 ADCs and prints their values on the UART1 is available as a whole WinAVR project here: cerebot_sample_ADCs_LEGO.zip.
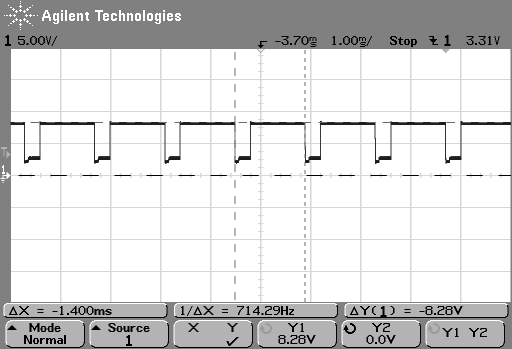
The following figure shows the plot of the signal on the sensor terminal of the module.
RCX 9V Motors
Cerebot has support for output for H-Bridge type devices, like the DC motors. However, I think that this output is only max 3.3V (VCC) and thus we need those PMOD C0 for the RCX motors. Otherwise, old RCX 9V motors can be controlled the same way as NXT motors, except that they do not have the digital feedback, see below.
NXT Servo Motors
NXT motors are a bit much better than older RCX motors. In particular, they are almost 10-times stronger, they are geared-down more, so they do not necessarily need shaky extrernal LEGO gears, and they have built in rotation sensors. They are called servo-motors - but in fact they are just usual DC motors with PWM control with rotation sensors. So they become kind of servo motors together with the NXT controller. To be controlled from Cerebot, one just needs to use the usual H-bridge driver, I guess.
A very nice comparison of LEGO motors is on Philo's page. He also has a beautiful page on NXT motor internals - mainly mechanics. The actual electrical specifications and cable specifications one has to dig out directly from LEGO's NXT'REME site, which contains a detailed hardware developer kit. Finally, you can look at some Measurements of NXT motors that I performed with an oscilloscope.
Thus to connect the NXT servo motors, we are in the same situation as with connecting the RCX motors: we need external transistor drivers.
We have now tried with HB2 pmod from Digilent, and obtained a little bit confusing behavior. But it works, and that is important. Our first robot with an example program is described at its own page.
ATmega64 provides the possibility to configure its timers so that they generate a specific duty-cycle on one of the OCNx output pins (6 output pins for timer1, and 1 output pin for timer0, and finally timer2 can generate a signal as well, but shares a pin with one of those of timer1 - so we rather keep it for generating interrupts for reading sensors, task-switching or other purpose). The following project demonstrates how to control 7 independent DC motors through HB2 PMODs connected to Cerebot. It allows setting speed for each motor, or to groups of motors, changing their directions, and turn them on and off, all individually: cerebot_motors.zip (this is still yet fully tested). In this way, the motors are controlled by PWM signal that is generated by the AVR processor without using any CPU time (not even interrupts).
NXT Sensors
See the review published here.
Other Sensors: Fly Eye
Fly Eye is an intelligent sensor with 7 IR-photo-diodes pointed in various direction. Its purpose is to detect the direction to the soccer ball, as well as its distance (light intensity). It has a PIC processor on board, and connects with three wires. Two of them supply the power (GND, VCC), somewhere between 7.2 and 12VDC. We will use 9V as it is a stable power source also for Cerebot. The last wire is an analog signal encoding digital information coming from the sensor, encoded in the analog range of 0-5V. The range is divided into 16 output level intervals, 7 indicating the direction of the strongest IR input, and 10 providing the information about the IR-light strength.
With Cerebot, we use the VU, and GND signals for the two power wires of Fly Eye, and connect the last wire to a resistor divider with its probe connecting to the ADC0. Since Cerebot does not have the AVR's AREF pin connected, we have to scale the 0-5V into one of the internal ADC levels - for example to the VCC. Our attempt with 150k/120k resistors requires a bit modified formula, but otherwise seems to detect the ball nicely - and even at a relative long distance!
A test program is here: fly_eye.zip.
Tutorial
References
- Article about AVR Robot Controller
- Interfacing FPGAs with LEGO Mindstorms
- Nidarbot - first robot with Cerebot we built
Note: this page is also included in RoboCup Norway Wiki.
--- --- --- --- --- RoboWiki: (c) 2006 Robotika.sk --- --- --- --- ---
