Difference between revisions of "Visual navigation for Acrob or SBOT robot with Android with camera ( Marek Kádek, Jana Sucháneková)"
(→Zdrojáky) |
(→Trénovanie neurónovej siete) |
||
| Line 194: | Line 194: | ||
==== Trénovanie neurónovej siete ==== | ==== Trénovanie neurónovej siete ==== | ||
| + | |||
| + | Ukážka spôsobu implementácie trénovania neurónovej siete: | ||
| + | |||
| + | import java.awt.image.BufferedImage; | ||
| + | import java.awt.image.Raster; | ||
| + | import java.io.File; | ||
| + | import java.util.ArrayList; | ||
| + | import javax.imageio.ImageIO; | ||
| + | import org.neuroph.core.learning.SupervisedTrainingElement; | ||
| + | import org.neuroph.core.learning.TrainingSet; | ||
| + | import org.neuroph.nnet.MultiLayerPerceptron; | ||
| + | import org.neuroph.util.TransferFunctionType; | ||
| + | public class Run { | ||
| + | public static final int INPUT_VECTOR_SIZE = 20*20*3; | ||
| + | public static final int OUTPUT_VECTOR_SIZE = 3; | ||
| + | public static void main(String[] args) { | ||
| + | ArrayList<File> images = listFilesForFolder(new File("./imgs/")); | ||
| + | TrainingSet<SupervisedTrainingElement> trainings = new TrainingSet<SupervisedTrainingElement>(INPUT_VECTOR_SIZE, OUTPUT_VECTOR_SIZE); | ||
| + | for (File f :images) { | ||
| + | addFileToTraining(f, trainings); | ||
| + | } | ||
| + | MultiLayerPerceptron mlp = new MultiLayerPerceptron(TransferFunctionType.SIGMOID, INPUT_VECTOR_SIZE, 24, 12, OUTPUT_VECTOR_SIZE); | ||
| + | System.out.println("training"); | ||
| + | mlp.learn(trainings); | ||
| + | mlp.save("./networks/latest.nnet"); | ||
| + | System.out.println("done"); | ||
| + | } //output | ||
| + | public static void addFileToTraining(File file, TrainingSet<SupervisedTrainingElement> trainings) { | ||
| + | ArrayList<Double> input = new ArrayList<>(); | ||
| + | ArrayList<Double> output = new ArrayList<>(); | ||
| + | if (file.getName().startsWith("circle")) { | ||
| + | output.add(1.0d); | ||
| + | output.add(0.0d); | ||
| + | output.add(0.0d); | ||
| + | System.out.println("Found circle: " + file.getName()); | ||
| + | } else if (file.getName().startsWith("other")) { | ||
| + | output.add(0.0d); | ||
| + | output.add(1.0d); | ||
| + | output.add(0.0d); | ||
| + | System.out.println("Found other: " + file.getName()); | ||
| + | } else if (file.getName().startsWith("square")) { | ||
| + | output.add(0.0d); | ||
| + | output.add(0.0d); | ||
| + | output.add(1.0d); | ||
| + | System.out.println("Found square: " + file.getName()); | ||
| + | } // input | ||
| + | try { | ||
| + | final BufferedImage bf = ImageIO.read(file); | ||
| + | final Raster raster = bf.getData(); | ||
| + | for (int i = 0 ; i < raster.getHeight(); i++) { | ||
| + | for (int j = 0; j < raster.getWidth(); j++) { | ||
| + | double[] buff = new double[3]; | ||
| + | raster.getPixel(i, j, buff); | ||
| + | input.add(buff[0] / 255.0d); | ||
| + | input.add(buff[1] / 255.0d); | ||
| + | input.add(buff[2] / 255.0d); | ||
| + | } | ||
| + | } | ||
| + | } catch (Exception e ) { | ||
| + | e.printStackTrace(); | ||
| + | } | ||
| + | trainings.addElement(new SupervisedTrainingElement(input, output)); | ||
| + | } | ||
| + | public static ArrayList<File> listFilesForFolder(final File folder) { | ||
| + | ArrayList<File> files = new ArrayList<File>(); | ||
| + | for (final File fileEntry : folder.listFiles()) { | ||
| + | if (fileEntry.isDirectory()) { | ||
| + | } else { | ||
| + | files.add(fileEntry); | ||
| + | } | ||
| + | } | ||
| + | return files; | ||
| + | } | ||
| + | } | ||
== Ukážka projektu == | == Ukážka projektu == | ||
Revision as of 12:20, 13 June 2013
Contents
Úvod
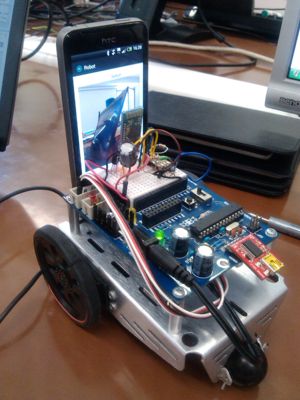
Cieľom projektu Editing Visual navigation for Acrob with Android with camera bolo vytvoriť robota, reagujúceho na vizuálne podnety v labyrinte pomocou snímania okolia kamerou mobilu s operačným systémom Android. Robot má byť spojený s telefónom pomocou protokolu bluetooth.
Výzor robota:
Postup riešenia
V prvej etape tvorby projektu bolo základom zložiť robota.
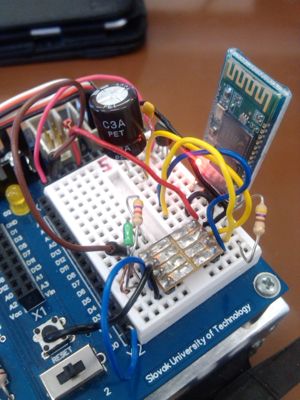
Ukážka obvodu:
V druhej etape sme vytvorili bluetooth spojenie medzi robotom a mobilným telefónom, pomocou knižnice Amarino - Android meets Andruino. Z rôznych zdrojov a diskusií na internete sme sa dozvedeli, že vytvorenie spojenia z android bluetooth na bluetooth modul robota je mnohokrát problémové a chyby sú ťažko odhaliteľné. Veľa rád práve smerovalo na použitie knižnice Amarino na riešenie tohoto problému.
Postup tvorby spojenia:
- Android zariadenie spárujeme s bluetooth modulom.
- Na android zariadenie nainštalujeme Amarino.
- Vytvoríme projekt v eclipse a do build path pridáme knižnicu.
- Vytvoríme a nacvičíme neurónovú sieť
Komunikácia
Ukážka nadviazania spojenia pomocou knižnice:
   private static final String DEVICE_ADDRESS =  "00:06:66:03:73:7B";
   private ArduinoReceiver arduinoReceiver = new ArduinoReceiver();

   @Override
   protected void onStart() {
       super.onStart();
       registerReceiver(arduinoReceiver, new IntentFilter(AmarinoIntent.ACTION_RECEIVED));
       Amarino.connect(this, DEVICE_ADDRESS);
   }
   @Override
   protected void onStop() {
       super.onStop();
       Amarino.disconnect(this, DEVICE_ADDRESS);
       unregisterReceiver(arduinoReceiver);
   }
   public class ArduinoReceiver extends BroadcastReceiver {
       @Override
       public void onReceive(Context context, Intent intent) {
       String data = null;
       final String address = intent.getStringExtra(AmarinoIntent.EXTRA_DEVICE_ADDRESS);
       final int dataType = intent.getIntExtra(AmarinoIntent.EXTRA_DATA_TYPE, -1);
       if (dataType == AmarinoIntent.STRING_EXTRA) {
           data = intent.getStringExtra(AmarinoIntent.EXTRA_DATA);
           if (data != null){
               try {
                   // tu mozeme spracovat data, ktore robot posle na mobil
               }
               catch (Exception e) {
           }
       }
    }
  }
Na odosielanie dát smerom na Arduino využívame funkciu
Amarino.sendDataToArduino(context, address, flag, data)
v našom prípade
Amarino.sendDataToArduino(MainActivity.this, DEVICE_ADDRESS, 'd', 5);
Na strane arduina potom pripravíme funkciu nasledovne: 1. includujeme hlavičku - #include <MeetAndroid.h> 2. v setupe nabindujeme 'd' na funkciu zatoč
   MeetAndroid meetAndroid;
   void setup()
   {
       ...
       meetAndroid.registerFunction(zatoc, 'd');
       ...
   }
3. pripravíme si funkciu zatoc
   void zatoc(byte flag, byte numOfValues)
   {
       ...
       // kod na zatocenie
       ...
   }
4. do loopu pridáme kód na príjmanie a spracovanie správ
   void loop()
   {
       ...
       meetAndroid.receive();
       ...
   }
Čítanie dát z kamery
Kód číta dáta z kamery, ktoré sú v YUV formáte, a využíva triedu YuvImage implementovanú v Androide na kompresiu do JPEG formátu. Následne ho preškáluje na požadovanú veľkosť (napr. 20x20) a uloží. Tieto dáta sú nasledne čítané a je na ne púštaná detekcia neurónovou sieťou.
   ... (rôzne inicializácie) ...
   int dataBufferSize=(int)(previewSize.height*previewSize.width*
   (ImageFormat.getBitsPerPixel(mCamera.getParameters().getPreviewFormat())/8.0));
   mCamera.addCallbackBuffer(new byte[dataBufferSize]);
   mCamera.addCallbackBuffer(new byte[dataBufferSize]);
   mCamera.addCallbackBuffer(new byte[dataBufferSize]);
   final Rect rect = new Rect(0, 0, previewSize.width, previewSize.height);
   mCamera.setPreviewCallbackWithBuffer(new Camera.PreviewCallback() {
   private long timestamp=0;
   private FileOutputStream out;
   private Bitmap bmp;
   final String seeFile = MainActivity.this.getCurrentSeeFile();
   public synchronized void onPreviewFrame(byte[] data, Camera camera) {
       synchronized (MainActivity.this) {
           try {
               try {
               YuvImage image = new YuvImage(data, parameters.getPreviewFormat(), previewSize.width, previewSize.height, null);
               OutputStream outStream = null;
               try {
                   outStream = new FileOutputStream( seeFile );
                   image.compressToJpeg(rect, 100, outStream);
                   outStream.flush();
                   outStream.close();
                   bmp = BitmapFactory.decodeFile( seeFile );
                   bmp = Bitmap.createScaledBitmap(bmp, SCALE_WIDTH, SCALE_HEIGHT, false);
                   out = new FileOutputStream( seeFile );
                   bmp.compress(Bitmap.CompressFormat.PNG, 100, out);
                   out.flush();
                   out.close();
                   }
                   catch (FileNotFoundException e)
                   {
                   e.printStackTrace();
                   }
                   catch (IOException e)
                   {
                   e.printStackTrace();
                   }
    	    } catch (Exception e1) {
             e1.printStackTrace();
           }
              camera.addCallbackBuffer(data);
          } catch (Exception e) {
              return;
           }
       return;
       }
   }
   });
   try {
   mCamera.startPreview();
   } catch (Throwable e) {
   mCamera.release();
   mCamera = null;
   return;
   }
Kameru je potrebné na konci uzavrieť, na to slúži metóda:
   private void stopVideo() {
   if(null==mCamera)
       return;
       try {
           mCamera.stopPreview();
           mCamera.setPreviewDisplay(null);
           mCamera.setPreviewCallbackWithBuffer(null);
           mCamera.release();
       } catch (IOException e) {
           e.printStackTrace();
           return;
       }
       mCamera = null;
   }
Neurónová sieť
Na tvorbu neurónovej siete sme použili knižnicu Neuroph. Tam sme natrénovali, aby rozoznávala požadované tvary. Stretli sme sa s nasledovnými problémami:
- Najnovšie Neuroph štúdio beží pod Java 1.7, a využíva novšie funkcie knižnice. Po natrénovaní sme sa snažili načítať natrénovanú sieť na Androide, avšak neúspešne.
- Staršia verzia Neuroph štúdia má problém s ukladaním siete. Tento problém sme dlho hľadali a zistili sme, že sa jedná o bug aplikácie, ukladanie funguje iba veľmi zriedka (spočiatku uloží nenatrénovanú sieť, no natrénovanú neukladá).
- Sieť sa v androide musí načítať vo zvláštnom vlákne, aby sme mohli využiť väčšiu stack size:
   ...
   new Thread(null, loadDataRunnable, "dataLoader", 65536).start();
   ...
   private Runnable loadDataRunnable = new Runnable() {
       public void run() {
           nnet = NeuralNetwork.load(  getResources().openRawResource(NETWORK_ID)  );
           imageRecognition = (ImageRecognitionPlugin) nnet.getPlugin(ImageRecognitionPlugin.class);
           Log.i(TAG, "Neural network loaded");
           detectionScheduler.schedule(detectionTask, 0, DETECT_IMAGE_PERIOD);
        }
   };
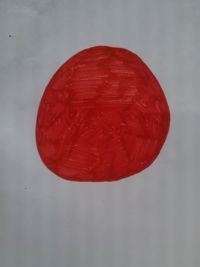
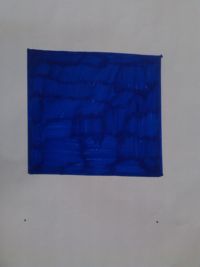
Príklad tvarov:
Trénovanie neurónovej siete
Ukážka spôsobu implementácie trénovania neurónovej siete:
   import java.awt.image.BufferedImage;
   import java.awt.image.Raster;
   import java.io.File;
   import java.util.ArrayList;
   import javax.imageio.ImageIO;
   import org.neuroph.core.learning.SupervisedTrainingElement;
   import org.neuroph.core.learning.TrainingSet;
   import org.neuroph.nnet.MultiLayerPerceptron;
   import org.neuroph.util.TransferFunctionType;
   public class Run {
       public static final int INPUT_VECTOR_SIZE = 20*20*3;
       public static final int OUTPUT_VECTOR_SIZE = 3;
       public static void main(String[] args) {
           ArrayList<File> images = listFilesForFolder(new File("./imgs/"));
           TrainingSet<SupervisedTrainingElement> trainings = new TrainingSet<SupervisedTrainingElement>(INPUT_VECTOR_SIZE, OUTPUT_VECTOR_SIZE);
           for (File f :images) {
               addFileToTraining(f, trainings);
           }
           MultiLayerPerceptron mlp = new MultiLayerPerceptron(TransferFunctionType.SIGMOID, INPUT_VECTOR_SIZE,  24, 12, OUTPUT_VECTOR_SIZE);
           System.out.println("training");
           mlp.learn(trainings);
           mlp.save("./networks/latest.nnet");
           System.out.println("done");
       } //output
       public static void addFileToTraining(File file, TrainingSet<SupervisedTrainingElement> trainings) {
           ArrayList<Double> input = new ArrayList<>();
           ArrayList<Double> output = new ArrayList<>();
           if (file.getName().startsWith("circle")) {
               output.add(1.0d);
               output.add(0.0d);
               output.add(0.0d);
               System.out.println("Found circle: " + file.getName());
           } else if (file.getName().startsWith("other")) {
               output.add(0.0d);
               output.add(1.0d);
               output.add(0.0d);
               System.out.println("Found other: " + file.getName());
           } else if (file.getName().startsWith("square")) {
               output.add(0.0d);
               output.add(0.0d);
               output.add(1.0d);
               System.out.println("Found square: " + file.getName());
           } // input
           try {
               final BufferedImage bf = ImageIO.read(file);
               final Raster raster = bf.getData();
               for (int i = 0 ; i < raster.getHeight(); i++) {
                   for (int j = 0; j < raster.getWidth(); j++) {
                       double[] buff = new double[3];
                       raster.getPixel(i, j, buff);
                       input.add(buff[0] / 255.0d);
                       input.add(buff[1] / 255.0d);
                       input.add(buff[2] / 255.0d);
                   }
               }
           } catch (Exception e ) {
               e.printStackTrace();
           }
       trainings.addElement(new SupervisedTrainingElement(input, output));
       }
   public static ArrayList<File> listFilesForFolder(final File folder) {
       ArrayList<File> files = new ArrayList<File>();
       for (final File fileEntry : folder.listFiles()) {
           if (fileEntry.isDirectory()) {
           } else {
           files.add(fileEntry);
           }
       }
   return files;
   }
   }
Ukážka projektu
Robot sa v bludisku pohybuje smerom dopredu, keď nevidí žiaden zo znakov, ktoré pomocou neurónovej siete rozpoznáva. V tomto prípade verí, že vidí null - čiže nič. V prípade, že zbadá pomocou kamery mobilného telefónu, pripevneného na ňom znak modrý štvorec, robot sa začne točiť doľava. V prípade, že rozpozná v bludisku červený kruh, otáča sa doprava. Robot sa každých 750 ms pozrie na to, čo vidí a to vyhodnotí. Z tohto dôvodu je pohyb robota nespojitý. Obraz sa naškáluje na 20x20 pixlov.
Záver
Robot dokáže rozoznávať medzi červeným kruhom a modrým štvorcom. Robot pri rozpoznávaní tvarov preukazuje menšie chybovosti, vyplývajúce z natrénovania neurónovej siete. Sklon kamery, pripevnenej na robotovi, spôsobuje tiež menšie odchýlky. Pohyb je nespojitý.


