Difference between revisions of "MiniMexle"
(→Changes) |
(→Technical documentation) |
||
| (22 intermediate revisions by the same user not shown) | |||
| Line 1: | Line 1: | ||
| − | + | [[Image:MexleBanner.png]] | |
| + | |||
| + | '''MiniMexle''' is an universal development board for Atmel AVR microprocessor ATmega88, which comes with an | ||
USB programmer, both in the form of the kit. Both programmer and the board are available from the | USB programmer, both in the form of the kit. Both programmer and the board are available from the | ||
[http://www.minimexle.de/ www.minimexle.de], all documentation is there. | [http://www.minimexle.de/ www.minimexle.de], all documentation is there. | ||
| + | The '''MiniMEXLE''' is the youngest child of the MEXLE family. Although it offers many nice features. The device can be connected to a personal computer using the AVR USB Progi. | ||
| + | <P Align="center"> | ||
| + | [[Image:MiniMexleBoard.jpg|400px|center|Vývojová doska MiniMEXLE.]] | ||
| − | + | <P> | |
| − | + | '''Processor:''' ATmega48/88 <BR> | |
| − | + | '''User interface:''' 2-lines LCD-Display, 4 Buttons <BR> | |
| − | + | '''Analog interface:''' 2 A/D and D/A-channels <BR> | |
| − | + | and many '''more...''' <BR> | |
| − | |||
| − | |||
| − | |||
| − | |||
| − | |||
| − | |||
| − | |||
| − | |||
| − | |||
| − | |||
| − | < | ||
| − | |||
| − | |||
| − | |||
| − | |||
| − | |||
| − | |||
| − | |||
| − | |||
| − | |||
| − | |||
| − | |||
| + | The '''MiniMEXLE''' is currently in use at Heilbronn University and Slovak University of Technology in Bratislava | ||
| + | to support students understanding microcontrollers. | ||
| − | + | Further information is available at the Software, Projects and Downloads section. | |
| + | This device may be purchased at the external [http://www.minimexle.de MiniMEXLE Shop]. | ||
| − | + | == Introduction == | |
| − | + | * See the [http://www.robotika.sk/holls/2008/doc/Gruhler2008_IntroductionMEXLE.pdf presentation]. | |
| − | + | == Technical documentation == | |
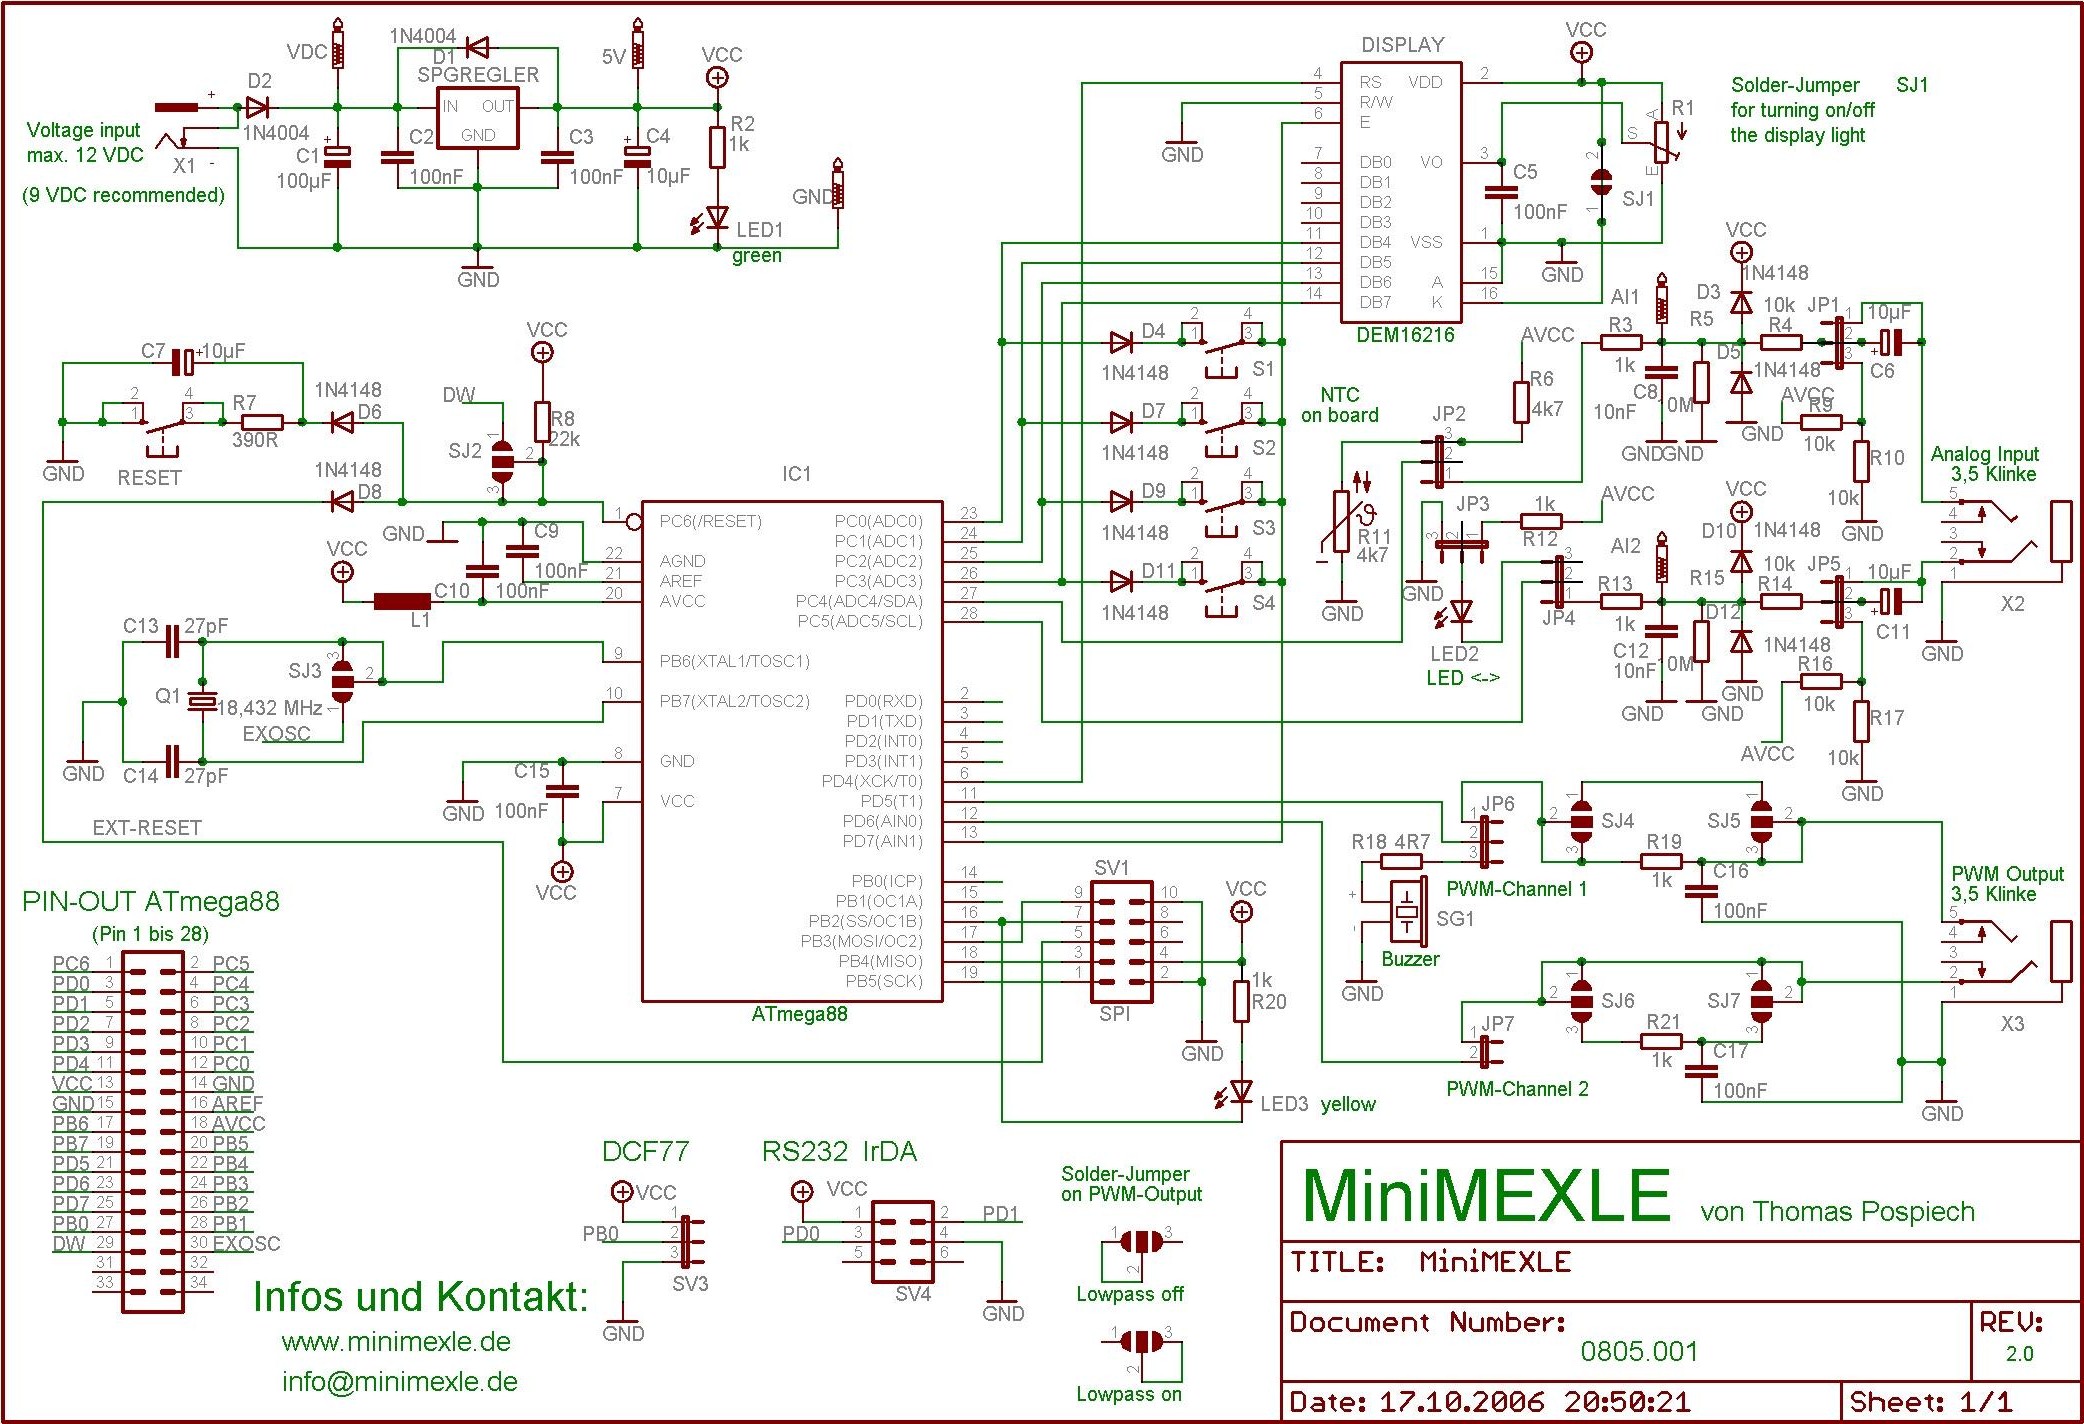
| − | + | * [[Media:MiniMexle_schematic.jpg|Schematic diagram]] | |
| − | + | * [http://ap.urpi.fei.stuba.sk/sensorwiki/images/6/63/MiniMexleSchematic.jpg Schematic diagram v3.0] | |
| − | + | * [[Media:MiniMexle_manual.pdf|Building manual]] (EN, v2.0/2006) | |
| + | * [[Media:MiniMexle_manual3.pdf|Building manual]] (DE, v3.0/2006) | ||
| + | * Microprocessor [http://www.atmel.com/images/doc2545.pdf datasheet] (atmel.com) | ||
| − | [[ | + | * MiniMexle Board [[Media:MiniMexleTestProgram.hex|test program (.hex)]] |
| − | |||
| − | |||
| − | + | See also notes to the [[MiniMexle board building]]. | |
| − | |||
| − | |||
| − | + | [[New life for MiniMexle]]: an Arduino compatibility. | |
| − | [[ | + | == White papers == |
| + | * Pospiech, T. and Knot, J. and Gruhler, G.: ''[http://www.radio.feec.vutbr.cz/ra2010/archive/ra2006/abstracts/086.pdf MiniMexle – The Microprocessor Development Board for Everyone]''. Proceedings of the Radioelektronika 2006 conference. April 2010, Brno. | ||
| + | * Pospiech, T. and Gruhler, G.: ''[http://www.hochschuldidaktik.net/documents_public/7._TdL_2007_-_Technik_129.pdf MiniMEXLE – ein studentengerechtes µC-System].'' 7. Tag der Lehre 2007, Fachhochschule Biberach. | ||
| − | + | == Remote controlled mobile robot using MiniMexle board in few steps: == | |
| + | # [[MiniMexleIO|Basic I/O operation]] | ||
| + | # [[MiniMexleServo|Minimexle and servomotor]] | ||
| + | # [[MiniMexleSerial|Basic serial communication]] | ||
| + | # [[MiniMexleBT|Bluetooth serial communication]] | ||
| − | |||
| − | |||
| − | [[ | + | [[Category:Mexle]] |
Latest revision as of 15:00, 5 December 2013

MiniMexle is an universal development board for Atmel AVR microprocessor ATmega88, which comes with an USB programmer, both in the form of the kit. Both programmer and the board are available from the www.minimexle.de, all documentation is there.
The MiniMEXLE is the youngest child of the MEXLE family. Although it offers many nice features. The device can be connected to a personal computer using the AVR USB Progi.

<P>
Processor: ATmega48/88
User interface: 2-lines LCD-Display, 4 Buttons
Analog interface: 2 A/D and D/A-channels
and many more...
The MiniMEXLE is currently in use at Heilbronn University and Slovak University of Technology in Bratislava
to support students understanding microcontrollers.
Further information is available at the Software, Projects and Downloads section.
This device may be purchased at the external MiniMEXLE Shop.
Contents
Introduction
- See the presentation.
Technical documentation
- Schematic diagram
- Schematic diagram v3.0
- Building manual (EN, v2.0/2006)
- Building manual (DE, v3.0/2006)
- Microprocessor datasheet (atmel.com)
- MiniMexle Board test program (.hex)
See also notes to the MiniMexle board building.
New life for MiniMexle: an Arduino compatibility.
White papers
- Pospiech, T. and Knot, J. and Gruhler, G.: MiniMexle – The Microprocessor Development Board for Everyone. Proceedings of the Radioelektronika 2006 conference. April 2010, Brno.
- Pospiech, T. and Gruhler, G.: MiniMEXLE – ein studentengerechtes µC-System. 7. Tag der Lehre 2007, Fachhochschule Biberach.